How to Test an Auto-Darkening Safety Helmet
 Whenever you are taking on a welding project, a welding helmet is necessary to keep yourself safe. There are many different types of welding helmets in our welding supply store, all in different styles with certain features, but by far the best helmet to choose in terms of safety and convenience is an auto-darkening helmet.
Even so, an auto-darkening helmet can never be guaranteed 100% safe until you test it — just like many other things. There are a bunch of different ways to test if an auto-darkening helmet is working properly, and we here at Canaweld would like to talk about them so you can try one out for yourself to ensure you’re going about your next project safely.
The Sun Test
Seeing as the sun emits extremely hot, bright rays of light, this type of situation is perfect to test your auto-darkening helmet with. The best part is this test requires little to no work — all you really need to do is step outside! Once you’re outside (and under the sun) stand there for a few minutes making sure that the sensors are facing the sun. If your lenses begin to darken, this is a good sign indicating your helmet is likely working perfectly fine. If there is no change in the darkness of your lens after a few minutes of standing outside under the sun, your helmet may be faulty, meaning it is time to take it back or get a new one.
Strike an Arc
This is considered a test that not everyone wants to implement, as it involves a bit more of a risk that you can easily avoid by performing other tests. In order to perform this test, you will need to wear all the safety equipment you would normally wear during a welding project. Once you have all of that on, put on your auto-darkening helmet and use your equipment to strike an arc. If the lenses react to the light you know your helmet is working just fine. This is considered one of the best ways to test your helmet (even if it’s more risky) due to the fact that this test will relate to what you actually end up working on — ensuring a near perfect guarantee your eyes and face will be safe during your upcoming weld.
Infrared Remote Test
Did you know that auto-darkening helmets have not just UV protection, but infrared protection layers as well? This means that if you use any IR product on the sensors, it should trigger the helmet’s lens to go dark. To test this, simply wear the helmet, grab any household TV remote (with an IR light) and point the remote straight at the helmet. Make sure to focus the remote’s IR diode right at the helmet’s lens, and press whatever key on the remote to activate it. If the helmet automatically darkens, you know you’re good to go!
It is important to note that you cannot use remotes that emit either A. pulsed signals or B. Radio frequency (RF), as they will not work.
The Pocket Lighter Method
This method is not the most conventional by any means — but it works just as well as the other ones! All you need to do for this test is take your pocket lighter, ignite it, and point the flame towards the auto-darkening helmet sensor. Wait for a bit to see results, and you should see the lens change shade.
Additional Steps to Testing a Helmet
Testing for Sensitivity & Delay
Auto-darkening helmets have what are known as “arc sensors” that will essentially control different shades within the helmet. It’s always good to see if your helmet comes with delay & sensitivity controls, as they are usually the most important settings on any helmet.
Once you’ve found them, adjust some of their settings and check the lens to notice any changes. After this, confirm they are adjusting to their proper setting based on the controls you input.
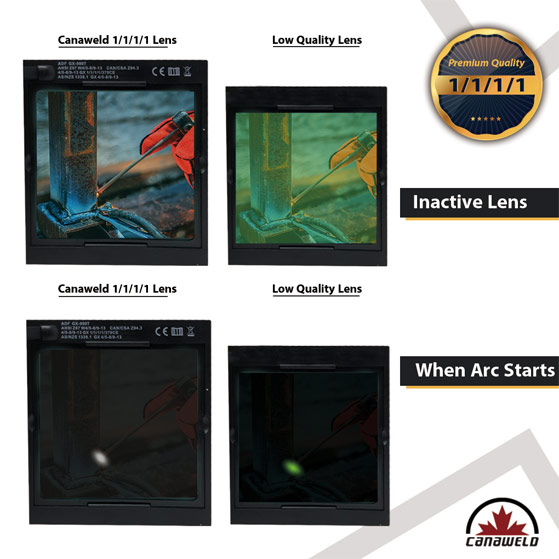
Clarity Test
This step is crucial in making sure your helmet is fully suitable to you and your needs. This test is considered the easiest and most straightforward, as all you have to do is put on the helmet and make sure it is clear enough to you when you look through the lens. In most cases, striking an arc will guarantee your helmet’s clarity and whether it is suitable or not.
ADF Test
The ADF (auto-darkening filter) plays a very important role in keeping your eyes safe from any damage during a welding process. In simplest terms, what it does is control the amount of light that is allowed to pass through the lens. Listed above are all of the ADF tests you can implement, so make sure to try at least one of them to ensure the lenses are working effectively.
Safety Test
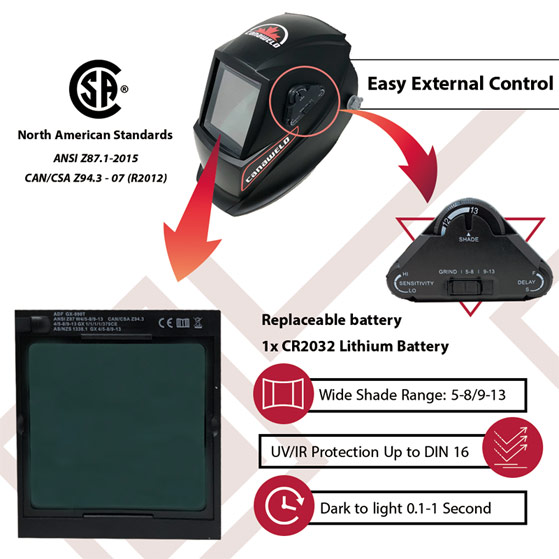
Every auto-darkening helmet must meet the safety requirements to ensure that every welder who uses it is completely protected and safe from welding-related injuries. In order to confirm that a welding helmet meets these standards, the best way to do it is by asking the store you purchased from for the helmet’s certifications. The crucial safety features for every auto-darkening helmet include:
- 100% UV and IR protection
- Resistant to impact
- Can withstand temperatures between 23-130 degrees fahrenheit
- Infrared filter
Lens Reaction Test
The reaction time of a lens (aka the switching speed), is essentially the time needed for the lens to get dark. The ideal amount of time for any auto-darkening helmet to switch is 1/2500ths of a second (some helmets may take a little longer than this).
The problem with a delayed lens reaction time is that you can possibly risk getting injured from sparks that are too large for the helmet to handle in that amount of time (as they can be extremely fast). The easiest way to test this is by putting the helmet on and trying different methods— then notice if the lenses are reacting at the right time or not.
Power Test
Most auto-darkening helmets will have two power sources — a solar panel and a lithium battery. Some use replaceable batteries whilst others will not, and it all depends on the type of helmet you purchase. It can be difficult to detect faulty batteries, so the best thing to do is ensure you have a warranty card for your helmet in case they don’t end up working. You can also go outside and charge the solar panel to test its working properly as well.
Grind-Mode Testing
Certain auto-darkening helmets will also have what is known as a grind mode. This means you are provided with buttons/switches that activate the auto-darkening feature. It is important to remember that auto-darkening will only work when this mode is turned OFF. You want to be sure grinding mode is always turned off when you are welding.
 Check Out Our Products Today!
When you want highly reliable & effective welders supplies, be sure to check out what we have to offer here at Canaweld. For years, our team has worked tirelessly to provide customers with all of the best welding products, machines and safety equipment — designed & assembled in Canada, all for a great price. To learn more about our store, be sure to contact us at (416) 548-5650 today!